Connecting to your data
Semaphor allows you to connect to a wide array of data sources, from databases and files to live APIs. If there's a custom data source you would like to connect to, feel free to send a request to support@semaphor.cloud.
Amazon S3
Setting Up a Cross-Account IAM Role for Semaphor Access
1) Create a Cross-Account IAM Role
- Create a
Cross-account IAM role. Please see the AWS docs (opens in a new tab) for instructions.
2) Assign Permissions to the IAM Role
- In the AWS Console, navigate to the IAM role's
Permissionstab. - Assign a policy to the role that grants access to your S3 bucket. The resource in the policy should specify your S3 bucket.
{
  "Version": "2012-10-17",
  "Statement": [
    {
      "Effect": "Allow",
      "Action": ["s3:GetObject", "s3:ListBucket"],
      "Resource": ["arn:aws:s3:::my-s3-bucket", "arn:aws:s3:::my-s3-bucket/*"]
    }
  ]
}
3) Define Trust Relationships
- Go to the
Trust relationshipstab of the IAM role. - Define a trust relationship that allows Semaphor to access your S3 bucket. You can copy and paste the trust relationship stub from the Semaphor console.
{
  "Version": "2012-10-17",
  "Statement": [
    {
      "Effect": "Allow",
      "Principal": {
        "AWS": "arn:aws:iam::756808986636:root"
      },
      "Action": "sts:AssumeRole",
      "Condition": {
        "StringEquals": {
          "sts:ExternalId": "my_project_id"
        }
      }
    }
  ]
}
4) Use the Fully Qualified Role ARN
- After creating the role, use the fully qualified role ARN when setting up the connection in the Semaphor console. For example:
arn:aws:iam::756808986636:role/semaphor-access-role. - Provide the
regionof your S3 bucket.
5) Verify the Connection
- Check the connection by clicking the ⚡️ button in the Semaphor console. A green ✓ mark indicates that the connection is successful.
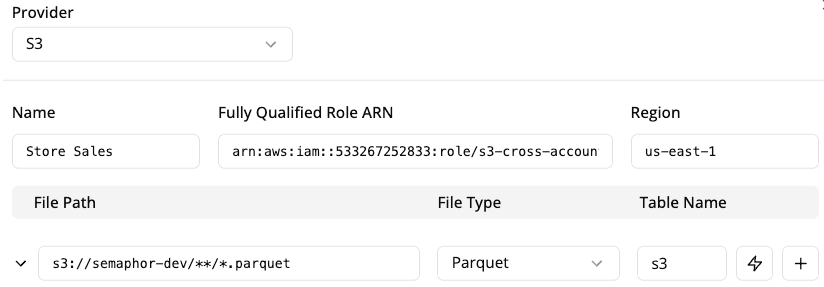
Currently, we support .parquet, and .csv formats. The example below shows connecting to an S3 bucket semaphor-dev.
The wildcard notation **/*.parquet instructs Semaphor to recursively retrieve all files in the root / prefix that end with .parquet.

Once the connection is successfully established, you can start analyzing your files like tables using SQL.
SELECT * from s3PostgreSQL
You can connect to PostgreSQL using the connection string format shown below:
postgresql+psycopg2://username:password@server:port/dbusername: Your database userpassword: Password of the userserver: Database serverport: Database port. Default is5432for PostgreSQLdb: Name of the database
MySQL
You can connect MySQL using a simple connection string as below:
mysql+mysqlconnector://username:password@server:port/dbusername: Your database userpassword: Password of the userserver: Database serverport: Database port. Default is3306for MySQLdb: Name of the database
Microsoft SQL Server
You can connect MS-SQL using a simple connection string as below:
mssql+pyodbc://username:password@server:port/db?ApplicationIntent=ReadOnly&driver=ODBC+Driver+17+for+SQL+Serverusername: Your database userpassword: Password of the userserver: Database serverport: Database port. Default is1433for MySQLdb: Name of the database
Google BigQuery
You can connect to BigQuery using the following connection string:
bigquery://project/datasetproject: Your Google projectdataset: Dataset name
In addition, you will also need to provide a service account key (key.json). You can follow the below tutorial to generate a service account key.
Make sure the service account has the following permissions:
- bigquery.datasets.get – Allows listing datasets in the project.
- bigquery.datasets.list – Allows listing datasets the user has access to.
- bigquery.projects.get – Allows getting project metadata.
Global filters with BigQuery
Please be aware that BigQuery has a quirk in that it doesn't accept the fully-qualified-column-name in the WHERE clause. So if you provide a query like below, and filter by country = 'US'.
SELECT * FROM my_dataset.my_table {{ filters | where }}Semaphor generates the where clause as below:
SELECT * FROM my_dataset.my_table WHERE my_dataset.my_table.country IN ( 'US' )
The above query throws an error in BigQuery. For all other databases this is a valid syntax.
As a workaround, you need to alias the table when you access it the first time
SELECT * FROM my_dataset.my_table as t {{ filters | where }}For the above query, Semaphor will resolve the filters to the alias t and generate the following query:
SELECT * FROM my_dataset.my_table as t WHERE t.country IN ('US')This is a valid syntax in BigQuery and will run without errors.
Snowflake
You can connect Snowflake using a simple connection string as below:
snowflake://username:password@organization-account/dbusername: Your database userpassword: Password of the userorganization-account: Your Snowflake organization and account separated by a dashdb: Name of the database
You can get the your organization and account from your Snowflake url:
https://app.snowflake.com/organization/account
You can also get your current account using the following SQL command:
SELECT CURRENT_ACCOUNT();